The ability to analyze various construction materials, components, existing structures without causing permanent damage to them is of paramount importance. This review article provides the earlier, recent advances and research about Non-Destructive Testing (NDT) methods in Civil Engineering, such as Visual Inspection (VI), Liquid Penetration Testing (LPT), Magnetic Particle Inspection (MPI), Ultrasonic Testing (UT), Radiographic Testing (RT), Acoustic Emission Testing (AET), etc. This article mainly focuses on the details of NDT methods, their scope, and their potential, limitations, inspections techniques, and interpretation.
1. Introduction
Civil Engineering mainly consists of construction and maintenance of Bridges, Buildings, Roads & Railways, Dams & Reservoirs, Water Supply & Waste Disposal Schemes, Tunnels & Power Houses, Runways & Airports, Harbors & Coastal Structures, Major & Minor Irrigation Schemes, etc. Testing is a vital process that allows inspectors and builders to identify potential raw material problems. It also helps to check quality at intermediate stages in production processes before committing resources to the project. It checks finished products by performing an actual stress test for legal requirements, including occupational safety and environmental regulations.
Based on the usefulness of the specimen after the test is performed, testing methods can be broadly categorized into two groups- Destructive Testing & Non-Destructive Testing. Destructive Testing performs failure mechanisms to determine the mechanical properties of materials such as ductility, tensile strength, compressive strength, yield strength, fracture toughness, which render the part unusable for its intended purpose. In contrast, Non-Destructive Testing (NDT) is a form of testing and analysis technique used in civil engineering to evaluate various construction materials, components, existing structures, etc. without causing permanent damage. It provides a cost-effective means for testing a sample or the whole structure.
2. Non-Destructive Testing Methods
2.1 Visual Inspection
Visual Testing is the most common technique based on visible defects on the surface, such as damage, corrosion, cracks, misalignment, and more. The accuracy of inspection can be aided using optical instruments such as magnifying glasses or computer-assisted systems. This method is inherent in most other types of NDT techniques. It is rapid and economical to perform, but expertise is required, and the outcome depends on the viewer’s skill.
2.2 Ultrasonic Testing
Ultrasonic Testing utilizes high-frequency sound waves for examination and measurements on the test area. It is broadly divided into Pulse-Echo (PE), Through Transmission (TT) Testing, Time of Flight Diffraction (ToFD). The setup mainly consists of three units, ultrasonic transducer, receiver, and display unit. An ultrasonic transducer is used to convert the given energy into an ultrasonic vibration, i.e., high-frequency ultrasonic sound energy, which is induced into the testing material. The pulse wave undergoes multiple reflections at the boundaries of the different material phases, and the velocity of the pulses is almost independent of the geometry of the material. If the material is good in terms of density, homogeneity, and uniformity, then high velocities are obtained, and if the material is of poorer quality, low velocities are obtained. If void, crack, flaw inside the material comes in the way of transmission of the pulses; the pulse strength is attenuated. The reflected sound wave signals received are transformed back into electric signals, and its intensity is shown on the display unit. The time traveled by sound waves is directly linked to the distance that the signal has traveled. Combining all the data, information about reflector location, size, orientation, and other features is determined.
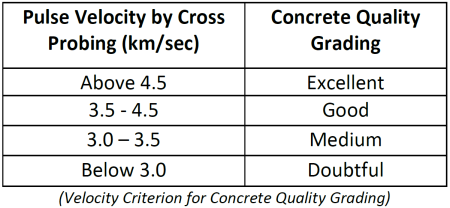
According to the guidelines given in the table, the quality of concrete in terms of cracks, segregation, uniformity, etc. can be assessed using Ultrasonic Pulse Velocity.
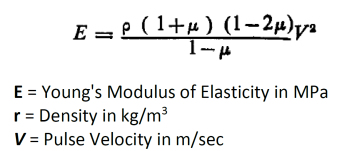
The Dynamic Young’s Modulus of Elasticity (E) of the concrete can be determined from obtained Pulse Velocity (V) and the Dynamic Poisson’s Ratio (m), using the relationship:
2.3 Magnetic Particle Testing
Magnetic Particle Testing (MPT) is a standard technique to detect flaws in ferromagnetic materials such as iron, cobalt, and nickel, along with some of their alloys. It is used to identify linear faults located at the surface or subsurface of ferromagnetic materials such as cracking, cold lap, pores, lack of sidewall fusion in welds, etc. Electromagnetic Testing is of three types, Eddy Current Testing, Remote Field Testing (RFT), Alternating Current Field Measurement (ACFM). Eddy Current utilizes an alternating current coil to induce an electromagnetic field into the testing piece. While Remote Field & Alternating Current Field Measurement, use a probe to introduce a magnetic field.
Mostly, a 110V AC handheld electromagnetic yoke magnet is used, with a white strippable paint as contrast background and iron powder particles in a liquid carrier base as a “magnetic ink.” Yoke magnet is used to magnetize the area. If a defect in surface or slightly subsurface is detected, the magnetic force lines will be deformed around the defect. The iron powder particle will bridge the gap formed by the defect when magnetic ink is applied and gives a visual indication against the white contrast background.
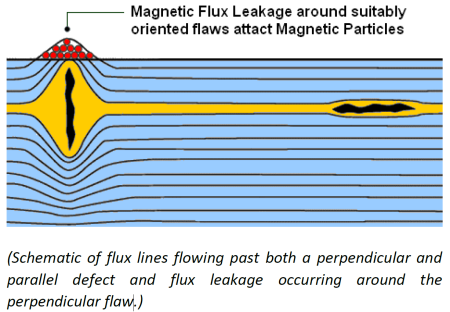
This NDT method is useful as it detects both surface and near sub-surface defects. It is incredibly portable & low cost, provides immediate results with rapid inspections, can detect faults that have been smeared over, inspect parts with irregular shapes such as connecting rods, etc.
2.4 Liquid Penetration Test
Liquid Penetration Testing involves the use of a fluid with low viscosity to the test material. The fluid seeps into any faults such a crack or porosity before a developer is applied, which allows penetrant liquid to seep upwards and create a visual indication of the flaw. It can be conducted using solvent removable penetrants, water washable penetrants, or post-emulsifiable penetrants. It is mostly used in the detection of several types of cracks in concrete, such as quench cracks, fatigue cracks, overload cracks, grinding cracks, impact fractures, and porosity cracks.
This NDT method is affordable, flexible, easy to use, and considered when visual inspection is not sufficient to detect the cracks in concrete, mainly in the case of liquid retention structures. It works on the Capillary Action principle, i.e., the ability of a fluid to flow in the narrow cracks without any external help, even in opposition to the forces such as gravity, to detect any concrete surface discontinuities.
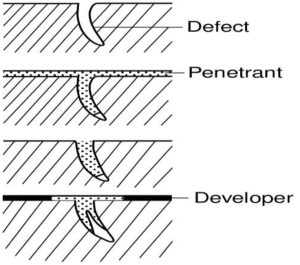
LPT is cost-effective, requires a minimal amount of training, and can be easily tested on complicated geometric shapes. It has a high sensitivity to small surface discontinuities. On the other hand, it requires pre-cleaning & post-cleaning, and extensive surface contamination may appear as defects. This method works only on materials with a relatively nonporous surface.
2.5 Radiographic Testing
Radiographic Testing (RT) uses x-rays or gamma rays to examine the internal structure for any flaws or defects. These radiation sources use higher energy levels, i.e., shorter wavelength versions of electromagnetic waves. In RT, the test material is placed between the radiation source and a film. The test material density and thickness differences will attenuate the penetrating radiation through interaction processes involving scattering and/or absorption. The differences in absorption are recorded on film(s) or through an electronic means.
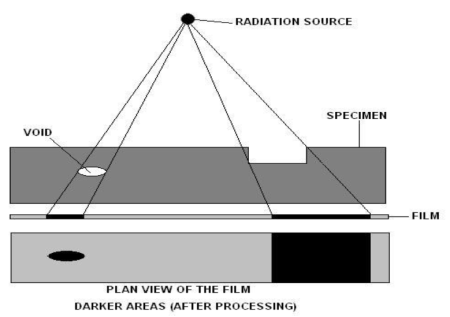
In Radiography, several imaging techniques are available to display the final images, i.e., Film Radiography, Computed Tomography (CT), Real-Time Radiography (RTR), Computed Radiography (CR), and Digital Radiography (DR). As Radioactivity is involved in this test, paramount importance must be given to ensure that the local rules are strictly adhered to during the testing process. Computer Tomography (CT) provides both cross-sectional and 3D volume images of the object under inspection. It allows a detailed analysis of the internal structure of a wide range of components. CT uses digital radiography equipment such as Nikon 450kV micro-focus, X-Tek Industrial 450kV broad-focus, X-Tek 225kV micro-focus, etc.
Radiographic Testing has many benefits over other NTD methods: –
- Can inspect assembled components
- Detects both surface and subsurface defects
- Minimum surface preparation is required
- Provides a permanent record of the inspection
- Verify internal flaws on complex structures
- Isolate and inspect internal components
- Automatically detect and measures internal flaws
- Measures dimensions and angles within the sample without sectioning
- Sensitive to changes in thickness, corrosion, flaws, and material density.
2.6 Acoustic Emission Testing
Acoustic Emission (AE) Testing detects and monitors the release of ultrasonic stress waves from localized sources when a material deforms under stress. It works by mounting small sensors on the component(s) under test. The sensors convert the stress waves into electric signals, which are used for further analysis. The waves are captured when the component experience external stimuli, such as high pressure, load, or temperature. As the intensity of the damage grows in the component, there is a higher release of energy. The rate at which acoustic emission is detected, the intensity of acoustic emission, and the loudness are monitored and used to assess structural integrity and for the health monitoring of the components. The acoustic emission source, i.e., the damage location, can be determined by using multiple sensors. It is used to monitor the health of concrete structures such as bridges and buildings.
Acoustic emission has many advantages over other methods; these include:
- Ability to detect a range of damage mechanism before they become significant issues
- Can locate damage sources and can differentiate them based on acoustic signatures
- Global monitoring of a structure
- Assesses the structure under real operational conditions
- Operational in hazardous environments, including high pressure, high temperatures, and corrosive & nuclear environment
- Can be conducted remotely
- Can detect damages that are difficult to access with conventional non-destructive testing techniques
However, this method cannot detect defects that may be present, but that does not move or grow. It is slower than other NDT techniques.
2.7 Ground Penetrating Radar
This NDT method sends radar pulses through the surface of the structure such as rock, ice, water, or soil. When it encounters any material boundaries with varying electromagnetic properties, the waves are reflected or refracted.
2.8 Leak Testing
Leak Testing (LT) is used to detect leaks using one of the four primary LT techniques:
- Bubble Leak Testing uses liquid or a soap solution for larger parts and look for the visual detection of gas, air, leaking from a pressurized system.
- Pressure Change Testing can be used only on a closed system, to monitor the loss of pressure or vacuum over a set period.
- Halogen Diode Leak Testing is done by pressurizing a system with a mixture of air along with halogen-based tracer gas. A halogen diode detection unit is used to sniff/locate any leaks.
- Mass Spectrometer Leak Testing use helium or helium-air mix inside the test chamber with a ‘sniffer’ to detect any change in the concentration of air sample, which would indicate a leak.
2.9 Thermal/Infrared Testing
Infrared testing or Thermography is used to determine the wavelengths of infrared light emitted from the surface of an object, with the use of sensors, which can be used to assess its condition.
2.10 Vibration Analysis
This process makes use of sensors to measure the vibration signatures from rotating parts to assess the condition of the component. The types of sensors usually include displacement sensors, velocity sensors, and accelerometers.
3. Future of Non-Destructive Testing
The development and use of new sensors, equipment, and miniaturization of devices are all paving ways to make effective use of NDT methods. Data Fusion techniques are developed to integrate several NDT methods and to enable effective data-acquisition, processing, and interpretation of test parameters with material integrity.
In the Digital Era, with more sophisticated equipment and extremely high computing power with faster processing time, data collected by various NDT methods can be used to develop software architecture to automate the process with accepted accuracy. Computer crunches large data sets in less time, which saves the workforce and reduce the occurrence of human errors. Data Centers and Cloud Computing are becoming the future of the digital world. The NDT datasets can be shared and monitored globally in the real-time scenario.
4. Conclusion
This article reviewed various NDT methods, and some with more significant details along with their benefits and limitations. Mostly, the component or structure under test is costly; So non-destructive testing has become more crucial and demanding. Factors such as efficiency, safety should be used in analyzing the best method for any particular purpose. Furthermore, the method chosen should minimize the costs incurred in operation.
References
- IS 13311-1 (1992): Method of Non Destructive testing of concrete, Part 1: Ultrasonic pulse velocity [CED 2: Cement and Concrete]
- https://en.wikipedia.org/wiki/Nondestructive_testing
- https://doi.org/10.1155/2013/834572 (Journal of Construction Engineering, Volume 2013, Article ID 834572)
- https://www.researchgate.net/publication/282938427_Non-Destructive_Testing_of_Concrete_A_Review_of_Methods (January 2015 Electronic Journal of Structural Engineering 14(1):97-105)
- Advances and Researches on Non-Destructive Testing: A Review (January 2018, 5(2):3690-3698 ) [ https://www.researchgate.net/publication/323989118_Advances_and_Researches_on_Non_Destructive_Testing_A_Review ]
- https://www.ndt.net/article/v06n05/rhazi/rhazi.htm
- https://www.ncbi.nlm.nih.gov/pmc/articles/PMC6804297/
- http://www.wermac.org/others/others_img/mpi.gif
- https://www.researchgate.net/publication/31715409_Applied_Materials_Science_Applications_of_Engineering_Materials_in_Structural_Electronics_Thermal_and_Other_Industries_DDL_Chung/figures?lo=1
- http://www.academia.edu/Documents/in/NDT
- https://www.researchgate.net/profile/Marco_Togni/publication/262876034_NDT_on_large_ancient_timber_beams_assessment_of_the_strengthstiffness_properties_combining_visual_and_instrumental_methods/links/0a85e5390e1cbcecdf000000.pdf
- https://en.wikipedia.org/wiki/Ultrasonic_testing
- https://www.bindt.org/What-is-NDT/Magnetic-particle-inspection-MPI/
- http://www.wermac.org/others/ndt_rt.html
- https://en.wikipedia.org/wiki/Industrial_radiography
- https://www.sciencedirect.com/topics/engineering/acoustic-emission-testing
- https://en.wikipedia.org/wiki/Acoustic_emission
- https://www.nde-ed.org/EducationResources/CommunityCollege/Other%20Methods/AE/AE_Intro.php
- https://eis.hu.edu.jo/ACUploads/10526/Liquid%20Penetrant%20Testing.pdf
- https://en.wikipedia.org/wiki/Dye_penetrant_inspection